Start/Finish Areas
The layout of the start/finish areas for orienteering events is basically the same for all forms.
a. Assembly Area. This is where orienteers register and receive instructions, maps, event cards, and start numbers. They may also change into their orienteering clothes if facilities are available, study their maps, and fill out their event cards here. Sanitation facilities should be available in this area.
b. Start. At the start, the orienteer reports to the recorder and timer's table to be logged in by the recorder and released by the timer.
c. Master Map Area. There are three to five master maps 20 to 50 meters from the start. When the orienteer arrives at this area, he must mark his map with all the course's control points. Having done this, he must decide on the route that he is to follow. The good orienteer takes the time to orient his map and carefully plot his route before rushing off. It is a good idea to locate the master map area out of sight of the start point to preclude orienteers tracking one another.
d. Equipment. The following is a list of equipment needed by the host of an orienteering event:
Master maps, three to five, mounted.
Competitor maps, one each.
Event cards, one each.
Recorder's sheets, two.
Descriptive clue cards, one each.
Time clocks, two.
Rope, 100 to 150 feet, with pegs for finish tunnel.
Card tables, one or two.
Folding chairs, two or three.
Results board.
Control markers, one per point.
Extra compasses.
Whistle, for starting.
First aid kit.
Colored tape or ribbon for marking route to master map and from last control point to finish.
e. Control Markers. These are orange-and-white markers designating each control point (Figure F-4). Ideally, they should have three vertical square faces, forming a triangle with the top and bottom edges. Each face should be 12 inches on a side and divided diagonally into red and white halves or cylinders (of similar size) with a large, white, diagonal stripe dividing the red cylinder. For economy or expediency, 1-gallon milk cartons, 5-gallon ice cream tubs, 1-gallon plastic bleach bottles, or foot-square plaques, painted in the diagonal or divided red and white colors of orienteering, may be used.
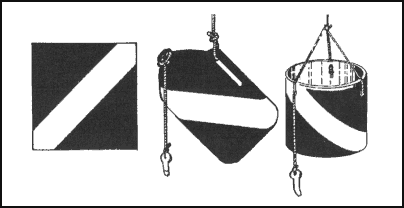
Figure F-4. Control markers.
(1) Each marker should have a marking or identification device for the orienteer to use to indicate his visit to the control. This marker may be the European-style punch pliers, a self-inking marker, different colored crayons at each point, different letter combinations, different number combinations, or different stamps or coupons. The marking device must be unique, simple, and readily transcribable to the orienteers' event cards.
(2) The control marker should normally be visible from at least 10 meters. It should not be hidden.
f. Recorder's Sheets. A suggested format for the recorder's sheet is de/imagested in Figure F-5.

Figure F-5. Recorder's sheet.
g. Event Card. The event card can be made before the event and should be as small as possible, as it is carried by the competitor. It must contain the following items: name, start number, start time, finish time, total time, place, and enough blocks for marking the control points. As indicated earlier, it may also contain a listing of descriptive clues (Figure F-6).
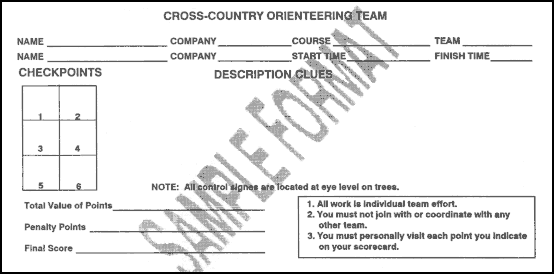
Figure F-6. Cross-country orienteering event card.
h. Results Board. This board displays the orienteer's position in the event at the finish (Figure F-7). There are a variety of ways of displaying the results, from blackboard to ladder-like to a clothesline-type device where each orienteer's name, point score, and times are listed.
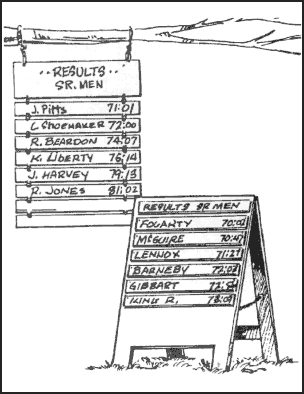
Figure F-7. Results board.
i. Clue Description Card. These cards are prepared with the master maps after the course is set. They contain the descriptive clues for each control point, control code, grid coordinate references, returning time for competitors, removal times for each location, and panic azimuth (Figure F-8). The terminology on these must be identical to that listed in the definition section. These cards and the master maps must be kept confidential until the orienteers start the event.
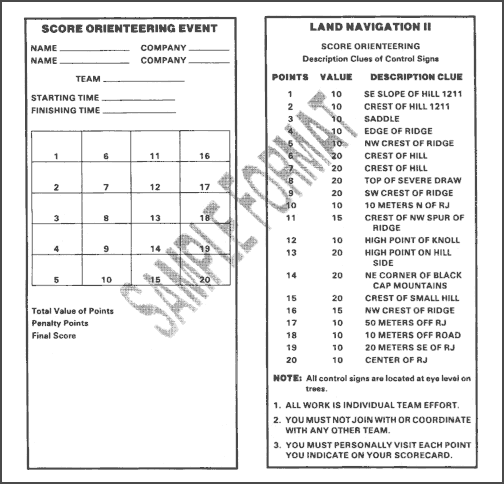
Figure F-8. Clue description card.
j. Scoring. The cross-country or free event is scored by the orienteer's time alone. All control points must be visited; failure to visit one results in disqualification. In this event, the fastest time wins.
(1) A variation that can be introduced for novices is to have a not-later-than return time at the finish and add minutes to the orienteer's final time for minutes late and control points not located.
(2) The score event requires the amassing of as many points as possible within the time limit. Points are deducted for extra time spent on the course, usually one point for each 10 seconds extra.
k. Prizes. A monetary prize is not awarded. A suggested prize for beginners is an orienteering compass or some other practical outdoor-sports item.
|


