Graphic (Bar) Scales
A graphic scale is a ruler printed on the map and is used to convert distances on the map to actual ground distances. The graphic scale is divided into two parts. To the right of the zero, the scale is marked in full units of measure and is called the primary scale. To the left of the zero, the scale is divided into tenths and is called the extension scale. Most maps have three or more graphic scales, each using a different unit of measure (Figure 5-2). When using the graphic scale, be sure to use the correct scale for the unit of measure desired.
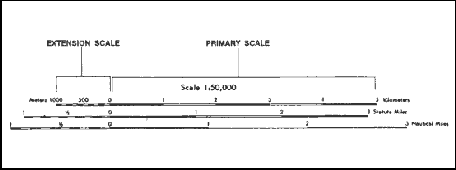
Figure 5-2. Using a graphic (bar) scale.
a. To determine straight-line distance between two points on a map, lay a straight-edged piece of paper on the map so that the edge of the paper touches both points and extends past them. Make a tick mark on the edge of the paper at each point (Figure 5-3).

Figure 5-3. Transferring map distance to paper strip.
b. To convert the map distance to ground distance, move the paper down to the graphic bar scale, and align the right tick mark (b) with a printed number in the primary scale so that the left tick mark (a) is in the extension scale (Figure 5-4).
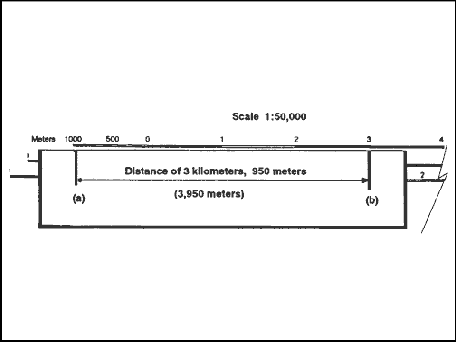
Figure 5-4. Measuring straight-line map distance.
c. The right tick mark (b) is aligned with the 3,000-meter mark in the primary scale, thus the distance is at least 3,000 meters. To determine the distance between the two points to the nearest 10 meters, look at the extension scale. The extension scale is numbered with zero at the right and increases to the left. When using the extension scale, always read right to left (Figure 5-4). From the zero left to the beginning of the first shaded area is 100 meters. From the beginning of the shaded square to the end of the shaded square is 100 to 200 meters. From the end of the first shaded square to the beginning of the second shaded square is 200 to 300 meters. Remember, the distance in the extension scale increases from right to left.
d. To determine the distance from the zero to tick mark (a), divide the distance inside the squares into tenths (Figure 5-4). As you break down the distance between the squares in the extension scale into tenths, you will see that tick mark (a) is aligned with the 950-meter mark. Adding the distance of 3,000 meters determined in the primary scale to the 950 meters you determined by using the extension scale, we find that the total distance between points (a) and (b) is 3,950 meters.
e. To measure distance along a road, stream, or other curved line, the straight edge of a piece of paper is used. In order to avoid confusion concerning the point to begin measuring from and the ending point, an eight-digit coordinate should be given for both the starting and ending points. Place a tick mark on the paper and map at the beginning point from which the curved line is to be measured. Align the edge of the paper along a straight portion and make a tick mark on both map and paper when the edge of the paper leaves the straight portion of the line being measured (Figure 5-5A).
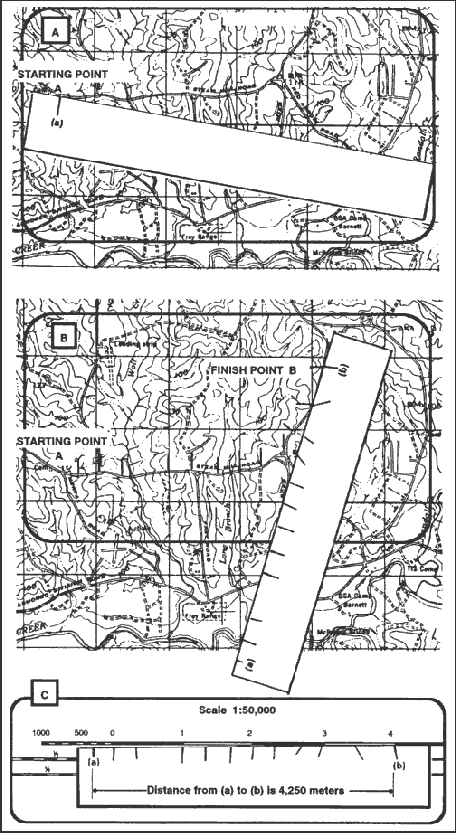
Figure 5-5. Measuring a curved line.
f. Keeping both tick marks together (on paper and map), place the point of the pencil close to the edge of the paper on the tick mark to hold it in place and pivot the paper until another straight portion of the curved line is aligned with the edge of the paper. Continue in this manner until the measurement is completed (Figure 5-5B).
g. When you have completed measuring the distance, move the paper to the graphic scale to determine the ground distance. The only tick marks you will be measuring the distance between are tick marks (a) and (b). The tick marks in between are not used (Figure 5-5C).
h. There may be times when the distance you measure on the edge of the paper exceeds the graphic scale. In this case, there are different techniques you can use to determine the distance.
(1) One technique is to align the right tick mark (b) with a printed number in the primary scale, in this case the 5. You can see that from point (a) to point (b) is more than 6,000 meters when you add the 1,000 meters in the extension scale. To determine the exact distance to the nearest 10 meters, place a tick mark (c) on the edge of the paper at the end of the extension scale (Figure 5-6A). You know that from point (b) to point (c) is 6,000 meters. With the tick mark (c) placed on the edge of the paper at the end of the extension scale, slide the paper to the right. Remember the distance in the extension is always read from right to left. Align tick mark (c) with zero and then measure the distance between tick marks (a) and (c). The distance between tick marks (a) and (c) is 420 meters. The total ground distance between start and finish points is 6,420 meters (Figure 5-6B).
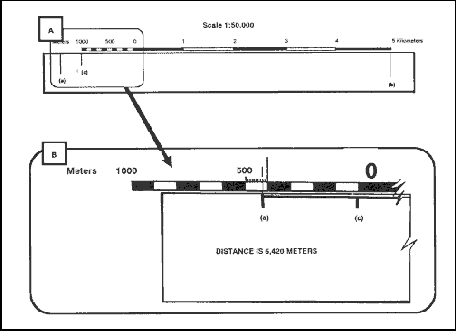
Figure 5-6. Determining the exact distance.
(2) Another technique that may be used to determine exact distance between two points when the edge of the paper exceeds the bar scale is to slide the edge of the paper to the right until tick mark (a) is aligned with the edge of the extension scale. Make a tick mark on the paper, in line with the 2,000-meter mark (c) (Figure 5-7A). Then slide the edge of the paper to the left until tick mark (b) is aligned with the zero. Estimate the 100-meter increments into 10-meter increments to determine how many meters tick mark (c) is from the zero line (Figure 5-7B). The total distance would be 3,030 meters.
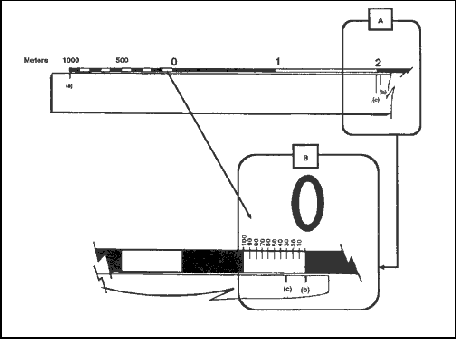
Figure 5-7. Reading the extension scale.
(3) At times you may want to know the distance from a point on the map to a point off the map. In order to do this, measure the distance from the start point to the edge of the map. The marginal notes give the road distance from the edge of the map to some towns, highways, or junctions off the map. To determine the total distance, add the distance measured on the map to the distance given in the marginal notes. Be sure the unit of measure is the same.
(4) When measuring distance in statute or nautical miles, round it off to the nearest one-tenth of a mile and make sure the appropriate bar scale is used.
(5) Distance measured on a map does not take into consideration the rise and fall of the land. All distances measured by using the map and graphic scales are flat distances. Therefore, the distance measured on a map will increase when actually measured on the ground. This must be taken into consideration when navigating across country.
i. The amount of time required to travel a certain distance on the ground is an important factor in most military operations. This can be determined if a map of the area is available and a graphic time-distance scale is constructed for use with the map as follows:
| R = Rate of travel (speed) |
T |
= |
Time |
| D = Distance (ground distance) |
T |
= |
D |
| —— |
| R |
For example, if an infantry unit is marching at an average rate (R) of 4 kilometers per hour, it will take about 3 hours (T) to travel 12 kilometers.
j. To construct a time-distance scale (Figure 5-8A), knowing your length of march, rate of speed, and map scale, that is, 12 kilometers at 3 kilometers per hour on a 1:50,000-scale map, use the following process:
(1) Mark off the total distance on a line by referring to the graphic scale of the map or, if this is impracticable, compute the length of the line as follows:
(a) Convert the ground distance to centimeters: 12 kilometers x 100,000 (centimeters per kilometer) = 1,200,000 centimeters.
(b) Find the length of the line to represent the distance at map scale—
| MD |
= |
1 |
= |
1,200,000 |
= 24 centimeters |
| ———— |
———— |
| 50,000 |
50,000 |
(c) Construct a line 24 centimeters in length (Figure 5-8A).
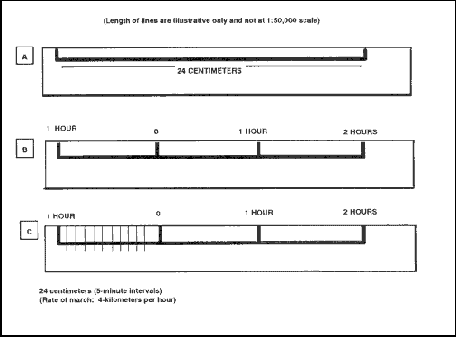
Figure 5-8. Constructing a time-distance scale.
(2) Divide the line by the rate of march into three parts (Figure 5-8B), each part representing the distance traveled in one hour, and label.
(3) Divide the scale extension (left portion) into the desired number of lesser time divisions—
1-minute divisions — 60
5-minute divisions — 12
10-minute divisions — 6
(4) Figure 5-8C shows a 5-minute interval scale. Make these divisions in the same manner as for a graphic scale. The completed scale makes it possible to determine where the unit will be at any given time. However, it must be remembered that this scale is for one specific rate of march only, 4 kilometers per hour.
Back to Scale and Distance
|


