Contour Intervals
Before the elevation of any point on the map can be determined, the user must know the contour interval for the map he is using. The contour interval measurement given in the marginal information is the vertical distance between adjacent contour lines. To determine the elevation of a point on the map—
a. Determine the contour interval and the unit of measure used, for example, feet, meters, or yards (Figure 10-2).
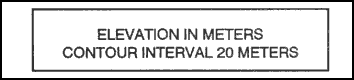
Figure 10-2. Contour interval note.
b. Find the numbered index contour line nearest the point of which you are trying to determine the elevation (Figure 10-3).
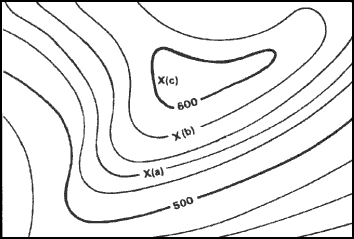
Figure 10-3. Points on contour lines.
c. Determine if you are going from lower elevation to higher, or vice versa. In Figure 10-3, point (a) is between the index contour lines. The lower index contour line is numbered 500, which means any point on that line is at an elevation of 500 meters above mean sea level. The upper index contour line is numbered 600, or 600 meters. Going from the lower to the upper index contour line shows an increase in elevation.
d. Determine the exact elevation of point (a), start at the index contour line numbered 500 and count the number of intermediate contour lines to point (a). Locate point (a) on the second intermediate contour line above the 500-meter index contour line. The contour interval is 20 meters (Figure 10-2), thus each one of the intermediate contour lines crossed to get to point (a) adds 20 meters to the 500-meter index contour line. The elevation of point (a) is 540 meters; the elevation has increased.
e. Determine the elevation of point (b). Go to the nearest index contour line. In this case, it is the upper index contour line numbered 600. Locate point (b) on the intermediate contour line immediately below the 600-meter index contour line. Below means downhill or a lower elevation. Therefore, point (b) is located at an elevation of 580 meters. Remember, if you are increasing elevation, add the contour interval to the nearest index contour line. If you are decreasing elevation, subtract the contour interval from the nearest index contour line.
f. Determine the elevation to a hilltop point (c). Add one-half the contour interval to the elevation of the last contour line. In this example, the last contour line before the hilltop is an index contour line numbered 600. Add one-half the contour interval, 10 meters, to the index contour line. The elevation of the hilltop would be 610 meters.
g. There may be times when you need to determine the elevation of points to a greater accuracy. To do this, you must determine how far between the two contour lines the point lies. However, most military needs are satisfied by estimating the elevation of points between contour lines (Figure 10-4).
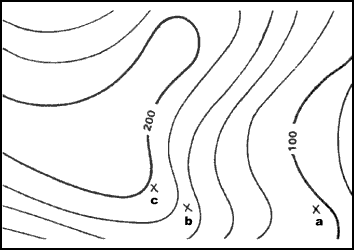
Figure 10-4. Points between contour lines.
(1) If the point is less than one-fourth the distance between contour lines, the elevation will be the same as the last contour line. In Figure 10-4, the elevation of point a will be 100 meters. To estimate the elevation of a point between one-fourth and three-fourths of the distance between contour lines, add one-half the contour interval to the last contour line.
(2) Point b is one-half the distance between contour lines. The contour line immediately below point b is at an elevation of 160 meters. The contour interval is 20 meters; thus one-half the contour interval is 10 meters. In this case, add 10 meters to the last contour line of 160 meters. The elevation of point b would be about 170 meters.
(3) A point located more than three-fourths of the distance between contour lines is considered to be at the same elevation as the next contour line. Point c is located three-fourths of the distance between contour lines. In Figure 10-4, point c would be considered to be at an elevation of 180 meters.
h. To estimate the elevation to the bottom of a depression, subtract one-half the contour interval from the value of the lowest contour line before the depression. In Figure 10-5, the lowest contour line before the depression is 240 meters in elevation. Thus, the elevation at the edge of the depression is 240 meters. To determine the elevation at the bottom of the depression, subtract one-half the contour interval. The contour interval for this example is 20 meters. Subtract 10 meters from the lowest contour line immediately before the depression. The result is that the elevation at the bottom of the depression is 230 meters. The tick marks on the contour line forming a depression always point to lower elevations.
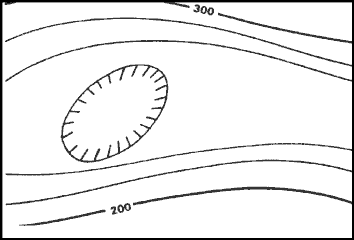
Figure 10-5. Depression.
i. In addition to the contour lines, bench marks and spot elevations are used to indicate points of known elevations on the map.
(1) Bench marks, the more accurate of the two, are symbolized by a black X, such as X BM 214. The 214 indicates that the center of the X is at an elevation of 214 units of measure (feet, meters, or yards) above mean sea level. To determine the units of measure, refer to the contour interval in the marginal information.
(2) Spot elevations are shown by a brown X and are usually located at road junctions and on hilltops and other prominent terrain features. If the elevation is shown in black numerals, it has been checked for accuracy; if it is in brown, it has not been checked.
| NOTE: |
New maps are being printed using a dot instead of brown Xs. |
Back to Elevation and Relief
|


